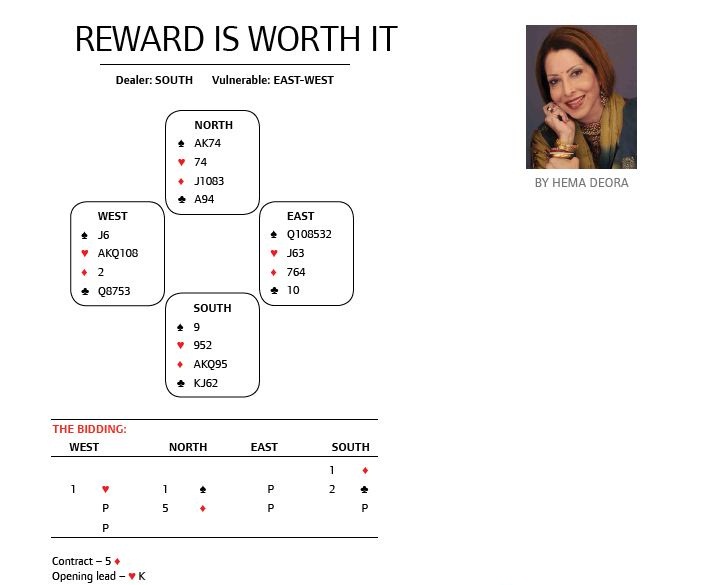
Some North’s, playing negative doubles, would double instead of bidding 1♠, playing that the direct bid of 1♠ should show a five card suit.
It’s a matter of style and distribution-showing bids, and the issue of
distribution may be a major clue to this hand. West led the ♥K and continued with the ♥Q as East followed with the ♥3 and ♥6. West then shifted to the ♠J.
South now must avoid a club loser. South must take his time.
While this hand looks simple (East either has the ♣Q or doesn’t), there is another element to play that many
players don’t appreciate. If one can be patient and attentive, counting out a
hand will pay dividends.
It seems clear that West has exactly five hearts. This is confirmed by
both the bidding and East’s plays of the ♥3 and ♥6. If South takes the time to
count out West’s hand, there will be a significant revelation about the club
suit. South should win the ♠K and
trump a spade with a high diamond. Then ♦A is followed by a second diamond to dummy’s ♦10. West will show out on the second diamond and yet
again, on the play of the ♦J. When the declarer then plays the ♠A, discarding a small club, West will show out on that suit as well.
Thus, West will have started with five hearts, two spades and one
diamond, leaving five clubs. Now, the only hope is that East’s one club is
either the ♣Q or ♣10. Here, a club from the dummy reveals East’s
singleton ♣10. South can now win the ♣K and lead a low club, finessing dummy’s ♣9 if West follows low.
Counting a hand requires a little time and effort but the reward is worth
it!
‘Effort and time will release its reward only after you refuse to quit!’
Wishing my readers ‘A Very Merry Christmas!’ and a lot of happy bridging!
Blog :
http://www.hemadeora.blogspot.in
Twitter ID : @HemaDeora
No comments:
Post a Comment