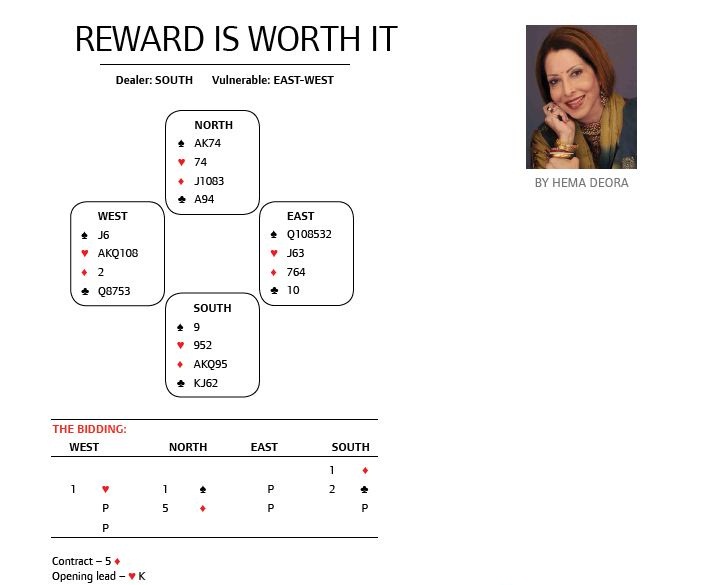
Sunday, 25 December 2016

A Spider and A Fly


West led Q and South won with the A and ran the 8. Sitting East was alert and sharp! As soon as West showed up with the QJ, East knew that declarer had all the missing points. (Note that he could see all four Jacks.) So, East realised declarer would make his contract unless given a nudge in the wrong direction.  So, East won the second trick with the A. Then he cashed the A and continued with the 5 and waited motionless, the way the spider waits for the fly!

South, thinking that the only way he could fail would be to duck this trick to West’s Q and watch East receive a diamond ruff: Naturally, South won the 5 with the K and took a second spade finesse. Imagine his surprise when East produced two deadly queens: first the Q, then the Q to put the contract down.

May all the sweet magic of Christmas conspire, To gladden your hearts and fill every desire!

Blog          : http://www.hemadeora.blogspot.in
Twitter ID  : @HemaDeora


Sunday, 18 December 2016

Suit Provides an Opportunity


Here is a juicy deal by ‘Apro’ sweet Dara!

Here is a long suit which provides an opportunity to set up two discards. The spade suit is more solid than it might first appear. West’s 8 lead is almost certainly top of a double ton and South can discard two diamonds from hand.

At trick one, declarer should play low from dummy, allowing his 9 in hand to force East to play J. When East switches to K, declarer can win, cash K and overtake Q with A in dummy to lead K. If East covers, declarer ruffs; if East plays low, South discards a diamond. This play can be made three times, providing the two discards required to pitch South’s diamond losers.

“Opportunities are like Sunrises, if you wait too long you miss them”

Blog          : http://www.hemadeora.blogspot.in
Twitter ID  : @HemaDeora

Sunday, 11 December 2016

A change of partner


West led 2 to Easts 10 and South won with A. He led a trump to dummy’s K, losing to East’s A. East cashed K and led the Q. If South ruffs low, West over ruffs; if South trumps high, West holding is promoted into a trick. If South crosses to dummy’s A and leads a heart from table, East can rise with the A, and plays two spades, declarer can afford to trump high without setting up a trick for West.. Now South can cash KQ, pitching spades from dummy.

But East can thwart this superior line. He wins A and cashes A and leads a low spade, which forces West to ruff. If West does not appreciate that East’s A was a singleton and he has striven to put West on lead to return a diamond, there is one further plan East could adopt: ‘a change of partner’!

If “Plan A” didn’t work, the alphabet has 25 more letters!
Stay cool!

Blog          : http://www.hemadeora.blogspot.in
Twitter ID  : @HemaDeora

Sunday, 4 December 2016

Winning Trade


After cashing the K, West continued with the A, dropping East’s Q, West next leads the 10. East ruffs, South over ruffs and pulls trump in one round.

West, who had opened and raised, almost surely had the K.  After South ruffs the third diamond, he should cash every one of trumps and then the K and A.

With three tricks left, South has the AQ and a club. Dummy to lead, has two hearts and a diamond, and West must likewise keep a high diamond and the K8.

South then leads the diamond and throws his losing club. He trades one loser for another, but it’s a winning trade; West must lead from the K, yielding the contract. It wasn’t Christmas cake walk indeed!


‘Bridge is like a hot bath. It feels good while you’re in it, but the longer you stay in, the more wrinkles you get’.


Blog          : http://www.hemadeora.blogspot.in
Twitter ID  : @HemaDeora

Thursday, 1 December 2016

REWARD IS WORTH IT


Some North’s, playing negative doubles, would double instead of bidding 1, playing that the direct bid of 1 should show a five card suit.

It’s a matter of style and distribution-showing bids, and the issue of distribution may be a major clue to this hand. West led the K and continued with the Q as East followed with the 3 and 6. West then shifted to the J.

South now must avoid a club loser. South must take his time.

While this hand looks simple (East either has the Q or doesnt), there is another element to play that many players don’t appreciate. If one can be patient and attentive, counting out a hand will pay dividends.

It seems clear that West has exactly five hearts. This is confirmed by both the bidding and East’s plays of the 3 and 6. If South takes the time to count out West’s hand, there will be a significant revelation about the club suit. South should win the K and trump a spade with a high diamond. Then A is followed by a second diamond to dummy’s 10. West will show out on the second diamond and yet again, on the play of the J. When the declarer then plays the A, discarding a small club, West will show out on that suit as well.

Thus, West will have started with five hearts, two spades and one diamond, leaving five clubs. Now, the only hope is that East’s one club is either the Q or 10. Here, a club from the dummy reveals East’s singleton 10. South can now win the K and lead a low club, finessing dummy’s 9 if West follows low.

Counting a hand requires a little time and effort but the reward is worth it!

‘Effort and time will release its reward only after you refuse to quit!’

Wishing my readers ‘A Very Merry Christmas!’ and a lot of happy bridging!


Blog          : http://www.hemadeora.blogspot.in
Twitter ID  : @HemaDeora