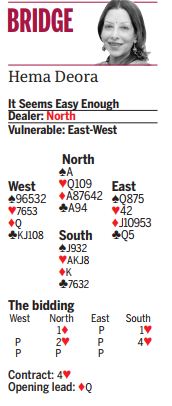
Wes’s first discard looked
harmless, but proved to have
fatal consequences. When
dummy went down, south did
not feel very hopeful of
success. things improved a
little when south played low
from dummy on the lead of
the ♣J and the ♣K popped up. Still, where was a ninth trick
to be found?
South won the ace of clubs
and crossed to dummy with a
spade to lead a heart to the
♥Q and West took it with the
♥K. West had no reason to
know the true heart position
and, of course, if declarer held
the ♥A, he would have only
one of the top diamonds. So, West switched to a low
diamond, east played the ♦J
and south took it with the ♦K. Now, south played a second
spade to dummy and West
pitched a heart, as would
many of us, I think. The
contract was now cold!
South played a second heart
and east won. But West’s
discard meant that defensive
communications had been
cut. If the hearts were not
cashed now, declarer would
win the return and cash his
black winners then put West in
with a club to lead into the ♦A - ♦10
at the end. So, east
cashed his heart winners, only
to squeeze his partner in the
minors. South won the
diamond switch and cashed
two spade winners and West
had no answer. Three NT made
for +600.
Blog : www.hemadeora.blogspot.in
Twitter ID :@HemaDeora