Sunday, 18 August 2019

THE DISAPPEARING TRICK


AFTER a long time, my friend from the 21st Floor sent me this interesting hand. Just the right thing on a rainy day.
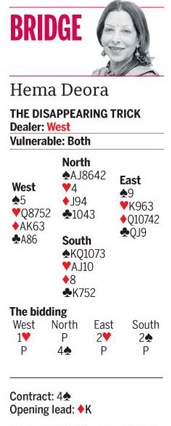
West’s pass of two spades must be regarded as much too conservative. He should have bid three diamonds instead. This might have elicited a further bid from East and led to a contract of five hearts which goes down only one.

As the bidding west, though, South was allowed to play in four spades and made the contract by careful play. West stared with A-K of diamonds, declarer ruffing the King.

South’s problem was to avoid losing three club tricks. Had he relied solely on East having the ace, he would have finished down one. But instead he placed his hopes on an end play that was practically sure to succeed.

After leading a trump to the ace and ruffing the last diamond, South again crossed to dummy with a trump and played a heart, finessing the 10 after East followed low. This unusual play rendered the defense helpless.

West won with the Queen, but could score only one more trick for his side. Whether he returned a heart, a diamond or a club. Whatever he hid South was bound to wind up with 10 tricks


Blog          : http://www.hemadeora.blogspot.in

Twitter ID  : @HemaDeora

Sunday, 11 August 2019

TRUMPS IN DEFENCE


NORTH opening 2 showed a hand of limited strength, containing spades and an unspecified minor. South’s response of 4 indicated that he was willing to play at the four level in partner’s minor suit. East-West could make at least 11 tricks or more in heart, as you see, but West understandably devalued his King of Spades.

There is only one lead that defiantly beats the club game- a trump! West could expect South to be short in spades and should probably have diagnosed that a trump lead was best. He actually led the King of hearts, ruffed in the dummy. Hoping to set up a crossruff, South now called for a low spade. East was in a difficult situation. To beat the contract, he needed to play the six. West could then win the trick and play a (somewhat belated) trump. However, if declarer had the bare spade King and West held the Ace of diamonds, it would be essential to rise with the Ace of spades and switch to diamonds. East rose with the spade Ace (It’s hard to blame him) switched to the Queen of diamonds.


South was hoping to take four spade ruffs in his hand. Since heart ruffs in the dummy would give him only three entries for this, he would need a diamond ruff entry too. He therefore ducked the Queen of diamonds. If East’s diamonds were headed by the Queen-Jack, and West overtook with the King to play a trump, declarer’s A 10 would then be worth two tricks


Blog          : http://www.hemadeora.blogspot.in

Twitter ID  : @HemaDeora

Sunday, 4 August 2019

LIVE OR DIE


THERE is an exodus to Delhi today by all aspiring bridge champions to take part in Hindustan Computer Limited (HCL) 17th International Bridge Championship. There is a very handsome prize money too. Where the Sharpest minds partner to conquer.

After West has lead K and East has signaled with 2, South must consider the deal as a whole. What will South do if West switches to a spade at trick two? Then he will live or die by the diamond finesse.

South should win the first trick and immediately take the diamond finesse. If it loses, he might get lucky and find that the hearts are breaking 4-4.

Don’t break someone’s heart, they have only one.

Break their bones, they have 206 of them.


Blog          : http://www.hemadeora.blogspot.in

Twitter ID  : @HemaDeora

Sunday, 28 July 2019

THE HONOR IS MARKED


SOMETIMES the location of a particular honour is marked from the bidding. 

Here South won ♣A and returned a club. West did best to win and returned a spade which South won in his hand; ruffed a club, returned to A, ruffed his last club, back to K and played all of his remaining spades. As he was about to play his last spade, he had last three cards in his hand, a spade, low heart and 10. Dummy had Q and AJ. On the play of last spade, West had to reduce to two cards and one must have been K, the other a heart. Declarer discarded Q from dummy and led a heart at trick twelve. West followed with a low heart and South hopped up with A. West’s other card was K. And obviously, Q dropped doubleton from East. 

'In this world, there is a place for every man, but every man must know his place'.


Blog          : http://www.hemadeora.blogspot.in

Twitter ID  : @HemaDeora


Sunday, 21 July 2019

CRUCIAL ENTRY


AMIDST a Long spell of bad cards, it is easy to fall into the rhythm of mindlessly following suit. However, the brilliance of bridge is that at any time one meticulous play can transform not only the fate of the contract, but your entire score.

West led 9 and East took his Ace and returned 7. South won, drew trumps and then led 7.

West played low: declarer tried 10 from dummy and East won with K. East played Q, which declarer trumped. Now, South led his diamond nine and West rose with diamond Ace. However, when West led a club, declarer could rise with Ace and discard his club Queen on the established diamond Queen, securing his contract.

When the diamond is first led, West must rise with diamond Ace and switch to a club. Now, if declarer plays low from dummy, he loses the trick and, if he rises, he has lost his crucial entry back to dummy.


Defination: Texas Transfer – relocation to a branch office in Dallas.


Blog          : http://www.hemadeora.blogspot.in

Twitter ID  : @HemaDeora

Sunday, 14 July 2019

A SMALL POSSIBLE GAIN


NO matter what the weather is like, when you get the juicy deal from ‘Apro’ Dara straight from Washington DC. It really brightens your Sunday. 

In the above deal, South jumped to show decent values and West prudently opted to defend rather than bidding on. West was vulnerable but sitting over South with a strong hand. The risk was high for only a small possible gain. 

West could count four defensive tricks. Since West hand contained only one trump, he focused on his partner’s trump length, even if low, might be promoted into a trick. 

West continued with K and then J. Declarer trumped with ♣J in dummy. South led ♠2 to his ♠J in hand. West grabbed his ♠A and laid down a fourth diamond. Now, to avoid dummy’s ♣6 being over-ruffed, declarer had to ruff with dummy’s ♣K. When trumps split 4-1 declarer gave up A, finally conceding the fourth round of trumps to East’s beautifully promoted ♣8. 

A happy partnership is a matter of give and take. You give in and your partner takes the credit.


Blog          : http://www.hemadeora.blogspot.in

Twitter ID  : @HemaDeora

Sunday, 7 July 2019

DUCK THE FIRST TRICK


Finally, monsoon is here for Mumbaikars. Parched earth welcomes it after a long summer. 

AT the table, when East played low, declarer won with ♠K, crossed to dummy with ♣A and led Q for the finesse.When West won K and led ♠7, South couldn’t avoid losing four further spade tricks, and was therefore defeated. 

The diamond suit is key: if the finesse is right, all is easy but, if West holds K, South would want him to have no further spades to lead. So, South can afford to duck the first trick. Because West cannot hold more than two spades since East had bid 1♠. 

West will lead his second spade and East’s ♠A will take South’s ♠K, but now, if East leads another spade, dummy’s ♠10 becomes a stopper. 

This deal is courtesy, ‘Apro’ Dara. 

What do you get if you mix ducks with fireworks?? 

‘Firequackers’.


Blog          : http://www.hemadeora.blogspot.in


Twitter ID  : @HemaDeora