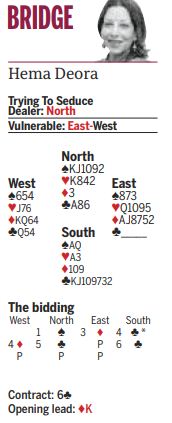
While South was concerned
about losing the first two
diamond tricks, he hoped for
East-West to hold a 10-card fit.
passing 5♣ would not have
been unreasonable.
West led the ♦K and East
overtook with ♦A and returned
the ♦7 to the ♦10 and ♦Q. Declarer ruffed in dummy. South would have started
trumps by leading to the King if
the defense had not forced
dummy at trick two. Since South could no longer do that
and pick up three trumps to
the Queen in the West hand, South had a decision to make. If South wanted to play West
for the three outstanding clubs South must risk a first-round
finesse, losing whenever East
started with the singleton or
doubleton Queen.
Of course, you should wonder
why East was so quick to
defend as he did when he
might have been giving you a
ruff-and-discard, and his
partner might have held the
♥A. Is he trying to protect his
partner’s trump holding or is
he trying to seduce you into
disastrous first-round finesse
into his unguarded Queen? If you believe that your
opponent is merely defending
well, then you will cross to the
♥A and play a club to eight.
When East shows out, you may
breathe a sigh of relief, cash
the ♣A cross to the ♠A cash
the ♣K to draw the last trump.
Blog : www.hemadeora.blogspot.in
Twitter ID :@HemaDeora
No comments:
Post a Comment